 Pin It
 I discovered this dessert on a crisp October afternoon when my neighbor handed me a bag of apples from her orchard, their skin still warm from the sun. She mentioned offhandedly that she always made something special with them, and I spent the evening experimenting in my kitchen, layering honeyed walnuts beneath a hand-woven lattice of paper-thin apple slices. The result was so striking that I made it again the next week, and it's become the dessert I reach for whenever I want something that looks impossible but tastes like home.
The first time I served this was to my sister's book club, and I'll never forget how they all fell silent when I brought it to the table. Someone asked if I'd bought it from a bakery, which made me laugh because the truth is much simpler: it's just patience and careful hands. Watching people slice into it revealed those honeyed walnuts, and suddenly it wasn't just dessert—it was a moment everyone remembered.
Ingredients
- All-purpose flour (1 1/4 cups): The foundation of your crust—I use unbleached whenever I can because it browns more beautifully.
- Unsalted butter, cold and cubed (1/2 cup): Keep it cold right until you're mixing; this is what creates those tender, flaky layers that shatter under your fork.
- Granulated sugar (2 tbsp, plus 2 tbsp more for apples): The small amount in the crust should be barely perceptible, letting the apples and honey shine.
- Salt (1/4 tsp for crust, 1/8 tsp for filling): Trust this even though it seems minimal—salt magnifies every other flavor.
- Ice water (3-4 tbsp): Add it slowly; you're looking for a dough that just barely holds together, not a smooth ball.
- Walnuts, chopped (1 cup): Toast them lightly beforehand if you have time; it deepens their flavor and makes them feel less like an afterthought.
- Honey (1/4 cup): Use something you'd actually eat by the spoonful—this deserves good honey.
- Light brown sugar (2 tbsp): This adds moisture and a subtle molasses note to the walnut layer.
- Ground cinnamon (1/2 tsp for filling, 1/2 tsp for apples): Don't skip the cinnamon on the apples themselves; it's what makes them taste like autumn.
- Firm, sweet-tart apples like Honeycrisp or Granny Smith (3 large): The variety matters more than you'd think—you need apples that hold their shape when thin-sliced and baked.
- Lemon juice (1 tbsp): This keeps the apples from browning and adds a brightness that balances the honey perfectly.
Tired of Takeout? 🥡
Get 10 meals you can make faster than delivery arrives. Seriously.
One email. No spam. Unsubscribe anytime.
Instructions
- Prepare your workspace and oven:
- Preheat to 375°F and grease your tart pan with a light hand—you want just enough butter to keep things from sticking. I like to place the pan on a baking sheet beforehand; it makes moving it in and out of the oven less nerve-wracking.
- Build the crust:
- Combine your flour, sugar, and salt, then work in the cold butter until it resembles coarse breadcrumbs—you want pea-sized pieces, not a paste. Add ice water one tablespoon at a time, mixing gently until the dough barely holds together when squeezed. Press it into your pan, prick the bottom with a fork, and chill for 15 minutes while you take a breath.
- Blind bake for structure:
- Line the crust with parchment, fill with pie weights or dried beans, and bake for 12 minutes. The weights prevent puffing; removing them halfway through lets the bottom set without over-browning. You're looking for a pale golden finish, almost shy.
- Spread the walnut honey base:
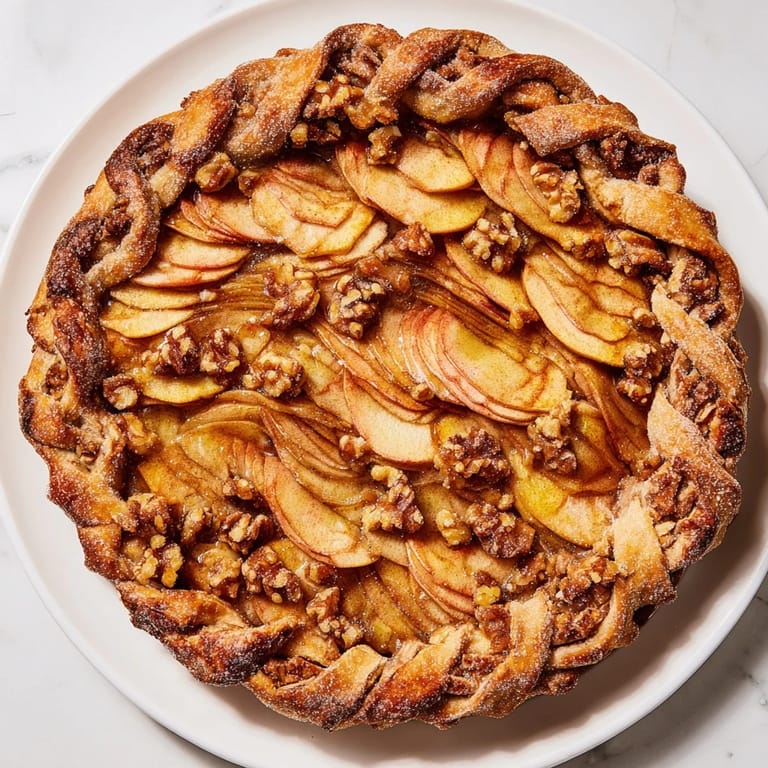
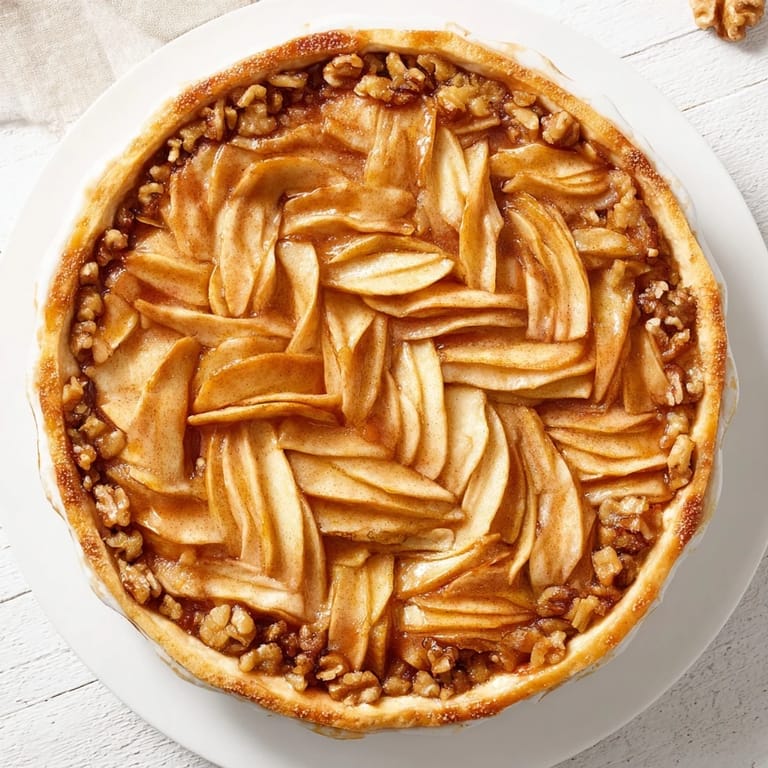
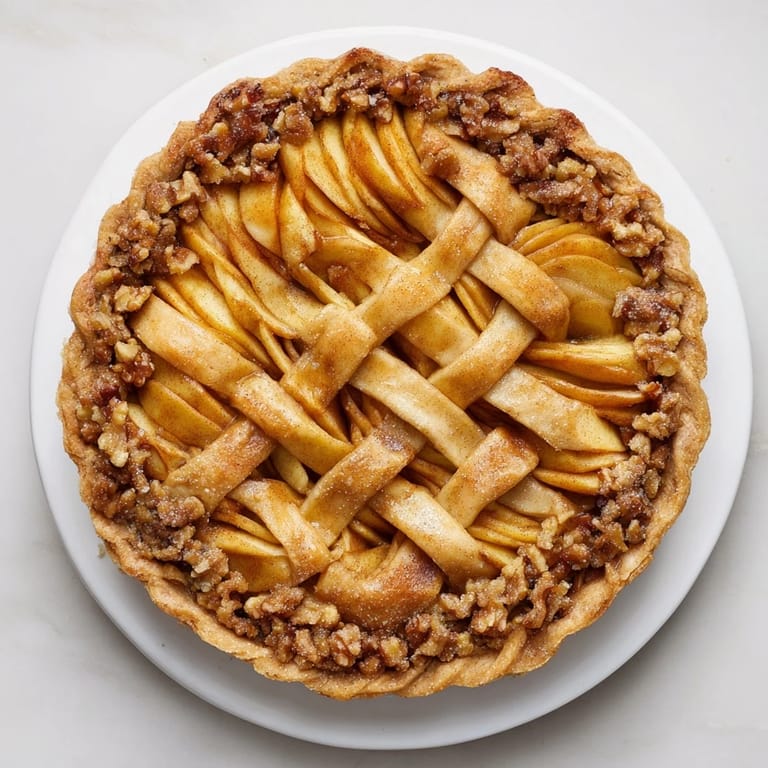
- Mix your walnuts, honey, brown sugar, cinnamon, and salt into a thick paste, then spread it evenly over the cooled crust. This layer is what makes people pause mid-bite and wonder what they're tasting.
- Slice apples with intention:
- Peel if you prefer (I usually do for a cleaner look), then slice as thinly as your knife or mandoline allows—about 1/8 inch. Toss immediately with lemon juice, sugar, and cinnamon so they don't brown and the flavors begin melding right away.
- Weave the lattice:
- This is where it looks impressive but isn't difficult: lay half your apple slices in parallel rows on parchment, slightly overlapping. Then weave the remaining slices over and under to create a pattern—it's like the simplest possible loom. When you're happy, slide the whole thing carefully onto your tart and trim the edges.
- Bake until golden:
- Cover with foil for the first 20 minutes to protect the crust from over-browning, then remove it and bake another 10 to 15 minutes. The apples should be tender when you pierce them, and the lattice should have turned a light caramel color. Let it cool for at least 20 minutes—this lets everything set and makes slicing cleaner.
 Pin It
 There was an evening when a friend who claimed not to like apples asked for seconds, then thirds. She said it wasn't the apples themselves—it was the way they tasted next to the honey and walnuts, like something that had been carefully thought through. That's when I realized this dessert isn't about complexity; it's about respect for each ingredient and the space it occupies on the plate.
The Architecture of Sweetness
The beauty of this tart is how its layers tell a story of flavor building on flavor. The buttery crust gives way to rich, honeyed walnuts, which then meet tender, spiced apples—each layer is distinct but inseparable from the others. When you plate a slice, you're serving three different textures and tastes in perfect harmony, which is harder to achieve than it sounds.
Seasonal Variations Worth Trying
I've made this in different seasons with whatever fruit was available, and it's always interesting. Late summer calls for stone fruits—peaches and plums woven the same way, with the same honey-walnut base. Winter is when I add a touch of cardamom to the walnut layer, or swap in pecans for a nuttier depth. Each version feels new while tasting familiar.
Serving and Storing Your Masterpiece
Serve this warm or at room temperature; honestly, it's wonderful both ways. A dollop of whipped cream or a scoop of vanilla ice cream won't hurt, but it's not necessary. If you brush the finished lattice with warmed apricot jam, it gets a professional-looking gloss that makes people think you've done this a hundred times.
- Leftovers keep covered at room temperature for two days, though it's rarely around that long.
- You can assemble the tart up to the lattice step the morning of serving and bake it just before guests arrive.
- For a gluten-free version, swap in your favorite blend and follow the same method—the results are just as stunning.
 Pin It
 This tart has become my answer to the question of what to bring when I want to give something meaningful. It says you took time, that you thought about the people you're feeding, that you believe in slowing down.
Recipe FAQs
- → What type of apples work best for the lattice?
Firm, sweet-tart apples like Honeycrisp or Granny Smith hold their shape well and balance sweetness.
- → How do I create the lattice top with apple slices?
Lay half of the thin apple slices in parallel rows and weave the remaining slices over and under them to form the lattice pattern.
- → Can I substitute walnuts with other nuts?
Yes, pecans make a delicious alternative, offering a slightly different flavor and texture.
- → What’s the best way to prevent the crust from getting soggy?
Blind baking the crust before adding the filling ensures it stays crisp and golden after baking.
- → How can I enhance the tart’s shine after baking?
Brushing the lattice top with warmed apricot jam adds a glossy finish and subtle sweetness.