 Pin It
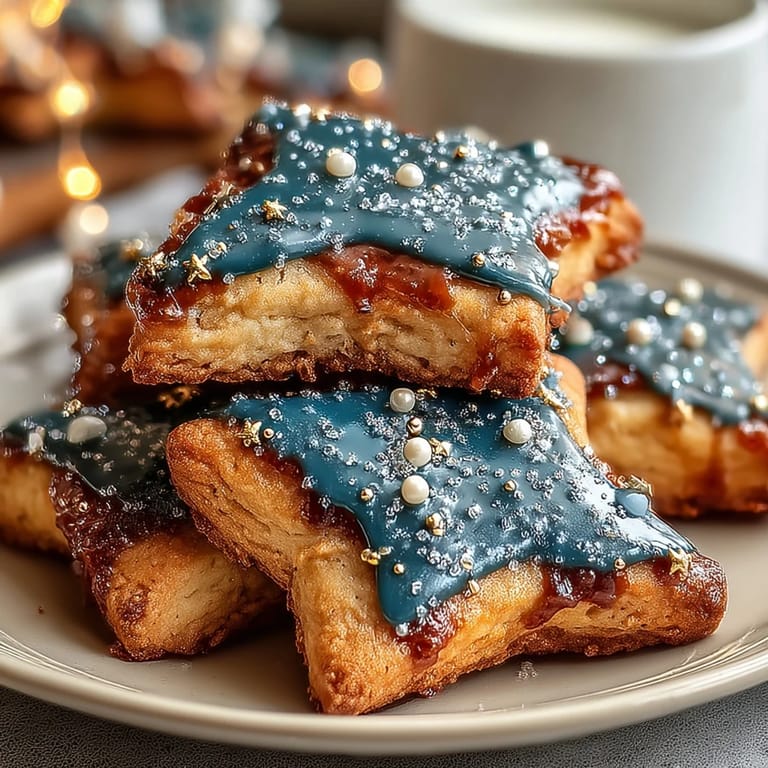
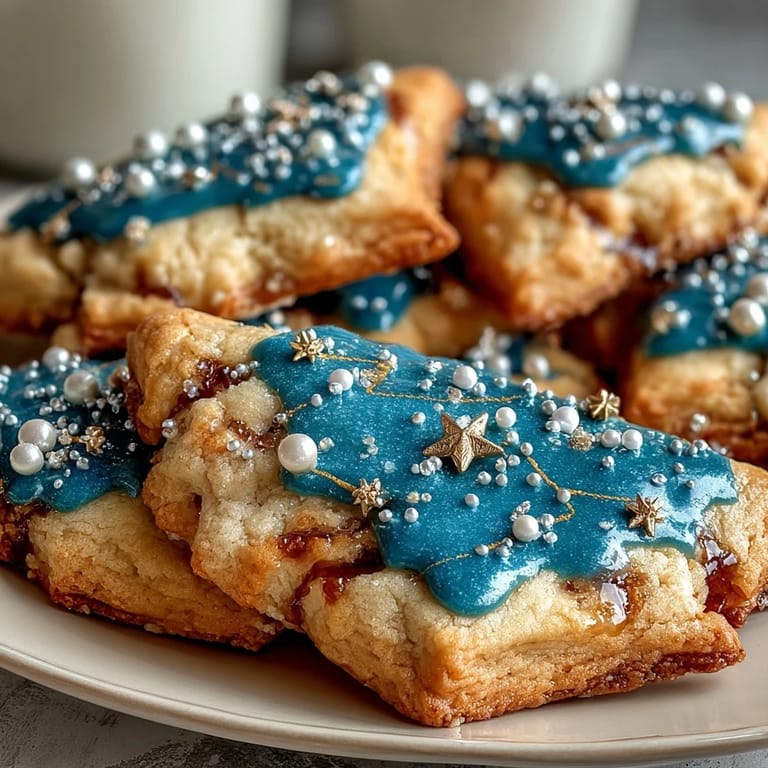
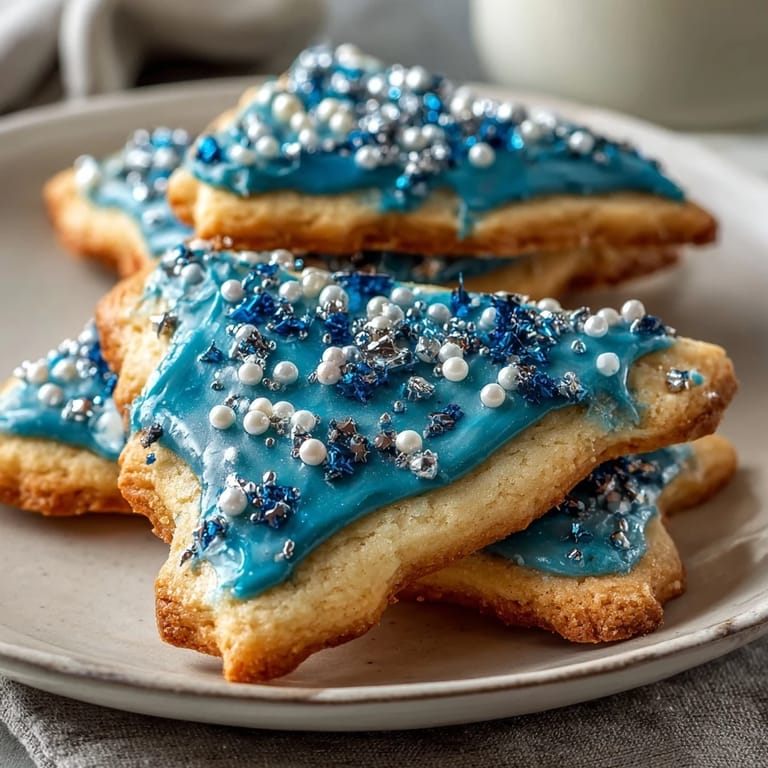
 My nephew spent an entire evening pointing at constellations through a telescope, and I found myself genuinely captivated by his wonder—especially when he got to Pisces, with its two fish connected by a silvery thread. That night planted a seed: what if I could capture that same magic in something edible? These sugar cookies became my love letter to stargazers, decorated with royal icing to map out the constellation across each delicate round. The first batch turned out slightly lopsided, but somehow that made them feel more authentic, like the actual scattered stars we were recreating.
I brought a batch to my book club last month, and watching grown adults light up at the detail was worth every minute of piping. One friend even held hers up to the light, studying the constellation like she'd never seen Pisces before—and maybe in this form, she hadn't. That moment reminded me why I love baking: it creates little reasons for people to slow down and notice something beautiful.
Ingredients
- All-purpose flour (2 1/2 cups): This is your foundation, and measuring by weight keeps your cookies consistent from batch to batch—a habit that's saved me countless times.
- Unsalted butter (3/4 cup, softened): Softness matters here; if it's too cold, you'll fight the mixer and end up with dense cookies, but slightly melted butter ruins the structure.
- Granulated sugar (1 cup): The sweetness carries the delicate vanilla, so don't be tempted to reduce it.
- Egg (1 large): Room temperature eggs incorporate more smoothly, creating that tender crumb you're after.
- Pure vanilla extract (2 teaspoons): The real stuff matters; imitation tends to taste tinny against the navy icing.
- Baking powder (1/2 teaspoon): Just enough lift to keep cookies tender without making them cakey.
- Salt (1/4 teaspoon): This tiny amount amplifies the vanilla and balances the sweetness.
- Powdered sugar for royal icing (2 cups, sifted): Sifting removes lumps that would ruin smooth piping—I learned this the hard way with clotted icing.
- Meringue powder (2 tablespoons): Creates that glossy, stable finish; it's the difference between icing that stays put and icing that weeps.
- Gel food coloring (navy blue, white, gold, or silver): Gel won't thin your icing like liquid food coloring does, which keeps your consistency perfect for piping.
- Edible pearls or dragees: These catch light beautifully and feel like tiny luxuries scattered across your cookies.
Tired of Takeout? 🥡
Get 10 meals you can make faster than delivery arrives. Seriously.
One email. No spam. Unsubscribe anytime.
Instructions
- Mix your dry ingredients:
- Whisk together flour, baking powder, and salt in a medium bowl, breaking up any flour lumps as you go. This even distribution prevents streaky, underbaked spots later.
- Cream butter and sugar:
- Beat softened butter and sugar together for about two to three minutes until the mixture is pale, fluffy, and noticeably lighter in color. This aeration is what makes the cookies tender instead of dense.
- Add egg and vanilla:
- Mix in the egg and vanilla extract, beating until everything is fully combined and the mixture looks smooth and creamy. Don't skip the mixing; this is where the dough gets its silky texture.
- Bring it together:
- Gradually add the dry ingredients to the wet mixture, stirring just until you see no streaks of flour—overmixing develops gluten and toughens the cookies. It should look shaggy at first, then come together.
- Chill the dough:
- Divide dough in half, flatten each portion into a disk, wrap tightly in plastic wrap, and refrigerate for at least one hour. This prevents the dough from spreading during baking and makes it much easier to roll out.
- Prepare for baking:
- Preheat your oven to 350°F (175°C) and line baking sheets with parchment paper. The parchment prevents sticking and ensures even browning on the bottom.
- Roll and cut:
- On a lightly floured surface, roll dough to about 1/4-inch thickness, aiming for consistency so all cookies bake evenly. Cut out circles or any shape that speaks to you—I use round cutters for the cosmic feel.
- Space them thoughtfully:
- Place cookies about one inch apart on your prepared baking sheets; they'll spread slightly during baking but this spacing keeps them from merging. Even spacing also helps them bake uniformly.
- Bake until golden:
- Bake for eight to ten minutes, watching for just the tiniest golden color at the edges—the centers might still look slightly soft, which is perfect. Remember that cookies continue to set as they cool, so pulling them out just shy of deep golden keeps them tender.
- Cool completely:
- Transfer cooled cookies to wire racks and let them rest completely before decorating. This ensures your royal icing sets properly without sliding off.
- Prepare the royal icing:
- Whisk together sifted powdered sugar, meringue powder, and three tablespoons of water until stiff peaks form, which takes about two to three minutes of steady whisking. If it's too thick to pipe, add water one teaspoon at a time.
- Divide and tint:
- Tint most of your icing navy blue for the night sky background, leaving some white for constellation piping and accents. Use a toothpick to add gel color gradually, stirring well—gel colors are concentrated and a little goes a long way.
- Frost the base:
- Spread or pipe a thin layer of navy blue icing across each cooled cookie, creating your night sky canvas. Let this set for about fifteen minutes before adding constellation details.
- Pipe the constellation:
- Using white icing in a fine piping tip, carefully dot stars and connect them with delicate lines to map out the Pisces constellation. Don't worry about perfect precision; slight variations make it feel more authentic.
- Add the starlight:
- While the white icing is still slightly wet, place edible pearls or dragees at the star points, pressing gently so they adhere. You can also add gold or silver accents around the constellation for extra sparkle.
- Let them dry:
- Allow cookies to dry completely—ideally for a few hours or overnight—before stacking or storing. This ensures the icing hardens fully and won't smudge when you handle them.
 Pin It
 There's a particular magic in handing someone a cookie that looks like it took hours in a professional kitchen, when really you spent a pleasant evening at home listening to music and piping stars. These cookies taught me that baking doesn't have to be stressful to feel special—sometimes the most meaningful food is the kind made unhurriedly, with attention to small details.
Why These Cookies Feel Different
Regular sugar cookies are lovely, but there's something about adding a purpose—a constellation, a story, a connection to something vast and beautiful—that transforms them from simple treats into tiny works of art. The navy blue icing against the pale dough reminds me of those moments lying on the grass at night, trying to spot patterns in the stars. Each cookie becomes a small meditation on wonder, and that intention travels to whoever receives them.
Getting Your Royal Icing Just Right
I've had batches where my icing was so thick it tore the cookie surface as I spread it, and others where it was so runny it pooled like a tiny ocean. The sweet spot is a consistency that spreads smoothly but holds its shape—think of it as thick enough to pipe, but fluid enough not to crack. If you're new to royal icing, mixing it slightly thinner at first feels safer; you can always add more powdered sugar to stiffen it, but you can't undo an oversaturated batch.
Making This Recipe Your Own
Once you've made these once, you'll realize the base cookie is actually a blank canvas for whatever constellation calls to you. I've made Orion for a friend who loves astronomy, Cassiopeia for someone going through a bold life change, even a custom design that wasn't technically a constellation but felt meaningful. The technique stays the same; only your imagination shifts.
- Try pairing these with chamomile tea for a peaceful evening, or serve them at a stargazing party with sparkling wine for something more celebratory.
- If piping feels intimidating, remember that a slightly shaky line looks intentionally artistic, and no one's going to compare your cookies to a textbook diagram.
- Make these a few days ahead if you're hosting—they store beautifully in an airtight container and actually taste better as the flavors meld.
 Pin It
 These cookies remind me that the best recipes are the ones that make you feel something beyond fullness—whether it's wonder, joy, or connection. Bake them once for yourself, then bake them again for someone who needs a little magic.
Recipe FAQs
- → What ingredients create the cookie base?
All-purpose flour, baking powder, salt, unsalted butter, granulated sugar, egg, and pure vanilla extract combine to form the tender sugar cookie dough.
- → How is the royal icing prepared for decoration?
Powdered sugar is whipped together with meringue powder and water until stiff peaks form. Different colors are achieved by adding gel food coloring.
- → How do I achieve the Pisces constellation design?
After icing the cookies with navy blue for the night sky, white icing is piped to outline the constellation, while edible pearls mark star points.
- → What baking steps ensure the right texture?
Chilling the dough before rolling helps with handling, and baking at 350°F for 8-10 minutes results in cookies that are lightly golden and tender.
- → Can decorations be customized?
Yes, edible gold or silver pearls can be swapped for white nonpareils or gold dragees, and other zodiac constellations can be featured for variety.