Pin It
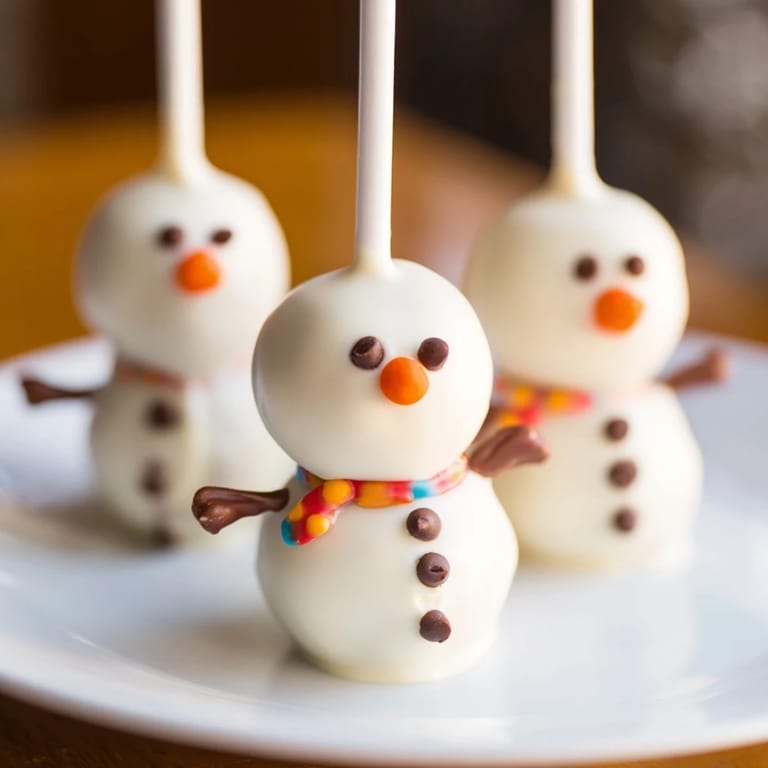
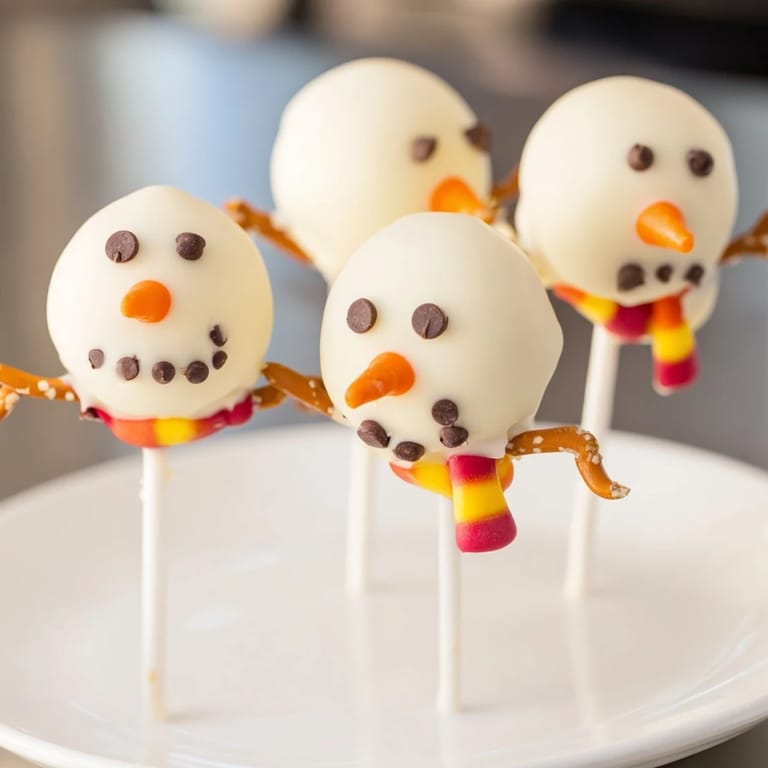
 My daughter burst into the kitchen one December afternoon with a magazine clipping, insisting we make Oreo snowmen for her class holiday party. I'd never attempted cake pops before, but something about her enthusiasm made me grab a food processor and get to work. Within an hour, our counter was dotted with these tiny edible snowmen, their chocolate-chip eyes watching us as we worked. She decorated each one like they were her own little creations, and by the time we were done, there was cocoa dust everywhere and we couldn't stop laughing.
Watching her friends' faces light up when they opened that container of snowmen felt like I'd created tiny edible magic. Even the shy kids who usually hung back during parties were suddenly diving into the treat table, asking if they could take extra ones home. That's when I realized this recipe wasn't just about making something delicious—it was about the moment when simple ingredients transform into something that makes people genuinely happy.
Ingredients
- Oreo cookies: You'll need about 36 from a standard package—don't throw away that cream filling since it's part of the magic here, creating a fudgy center that makes every bite interesting.
- Cream cheese: Use the softened kind so it blends smoothly without lumps; cold cream cheese will fight you and make the dough grainy.
- White chocolate or candy melts: Melts are more forgiving than real chocolate since they set faster and don't require tempering, though white chocolate tastes slightly richer.
- Mini chocolate chips or black decorating gel: Chips give you that rustic snowman look, while gel is cleaner and more precise if you care about that sort of thing.
- Orange sprinkles or icing: A tiny touch creates the carrot nose and honestly makes the whole thing feel less abstract.
- Pretzel sticks or fondant: Pretzels add a salty-sweet contrast, but fondant scarves feel more finished and photograph better.
- Lollipop sticks: These give you something to hold while dipping and become the spine of your snowman.
Tired of Takeout? 🥡
Get 10 meals you can make faster than delivery arrives. Seriously.
One email. No spam. Unsubscribe anytime.
Instructions
- Crush those Oreos:
- Pulse them in a food processor until they look like wet sand—fine enough that the dough holds together but not so fine it turns into chocolate powder. If you're using the zip-top bag method, place them inside and crush with a rolling pin until you've got crumbs in every size, then pick out the bigger chunks by hand.
- Build your dough:
- Mix the crushed cookies with softened cream cheese in a bowl using a fork or spatula—it'll seem impossible at first, like you're trying to blend two things that hate each other, but keep going. You'll feel the exact moment it shifts from separated to unified, and you'll know you're ready to roll.
- Roll your snowmen:
- Make 32 smaller balls (about the size of a marble) and 16 bigger ones (a bit larger than a grape). This gives you two-headed snowmen that actually look like snowmen instead of round blobs.
- Stack and stick:
- Press one small ball firmly onto each large ball—they should stick together from the cream cheese acting like glue. Push a lollipop stick through both, angling it slightly so it catches both balls, then line them up on parchment paper like little soldiers waiting for duty.
- Chill thoroughly:
- Twenty to thirty minutes in the freezer is non-negotiable here; they need to be solid enough that they won't slide off the stick when they meet hot chocolate. You'll know they're ready when they feel like tiny ice balls.
- Melt with intention:
- Heat your white chocolate slowly in a microwave-safe bowl, stirring every thirty seconds to keep it smooth and avoid burnt spots. If it seizes up and gets grainy, a tiny splash of coconut oil or shortening can bring it back to life.
- Dip with confidence:
- Hold each snowman by the stick and submerge it into the melted chocolate in one smooth motion, twisting gently to coat all sides. The excess should drip off naturally—if you're doing this right, you'll see a thin, even coating instead of a thick shell.
- Set them upright:
- A styrofoam block is ideal since you can just poke the sticks in and let gravity do the work, but a tall glass works too if you arrange the sticks carefully. Give them a few minutes for the coating to set enough that it won't drip when you decorate.
- Decorate while it's still warm:
- This is when the magic happens—chocolate chips stick naturally to the tacky white coat, so you can press them in for eyes and buttons without any fussy assembly. Orange icing or sprinkles go on for the carrot nose, and they'll adhere beautifully while everything's still slightly warm.
- Add the finishing touches:
- Once the chocolate coating is fully set, press pretzel sticks into the sides for arms or wrap tiny strips of fondant around the middle for scarves. These final details are what transform them from cute into genuinely charming.
 Pin It
 There's something deeply satisfying about turning packaged cookies into something that feels handcrafted and special. By the end of that first batch, my hands were covered in white chocolate, I'd accidentally eaten three of them in the name of 'quality control,' and my daughter was already asking when we could make them again.
Storage and Make-Ahead Magic
These actually improve after a day in the refrigerator as the flavors settle together, so you can make them the day before your event without stress. Keep them in an airtight container so they don't dry out, and they'll hold beautifully for up to five days. If you're making them weeks in advance, wrap each one individually in plastic wrap and freeze them—they'll last for months, and you can thaw them slowly in the fridge whenever you need a festive pop.
Customization Ideas
The foundation of this recipe is so flexible that you can make it work for any season or celebration. Swap the white chocolate for dark chocolate for Halloween, add red and green fondant scarves for Christmas, or use pastel melts and spring decorations for Easter. We've also experimented with tinted fondant in every color imaginable, and my favorite version has tiny scarves that match the colors of whoever we're giving them to—it's a small touch that somehow makes them feel personal.
Why This Works Better Than Regular Cake Pops
Traditional cake pops made from crumbled cake can be fragile and finicky, but this Oreo-based version is structurally superior. The cream cheese acts as both binder and flavor, creating a denser, more stable sphere that won't crumble as you dip it. Plus, everyone already knows they like the taste—it's Oreos and cream cheese, not experimental or risky.
- Make absolutely sure your cream cheese is softened or the dough will be impossible to roll.
- If your white chocolate begins to harden while you're dipping, microwave it for fifteen seconds to loosen it up again.
- The chocolate coating needs to be fully set before stacking or storing, or they'll stick to each other.
 Pin It
 These cake pops prove that the simplest recipes often make the biggest impact. They've become the thing people request and remember long after the party's over.
Recipe FAQs
- → Can I prepare these snowmen without a food processor?
Yes, you can crush Oreo cookies by placing them in a zip-top bag and using a rolling pin to break them into fine crumbs.
- → What is the best way to get smooth white chocolate coating?
Melt white chocolate or candy melts in short bursts in a microwave, stirring frequently until fully smooth to avoid burning.
- → How do I keep the snowman shapes stable during coating?
Chill or freeze the assembled snowmen before dipping to ensure they hold their shape and are easier to coat evenly.
- → Can I customize the decorations?
Absolutely, use mini chocolate chips, decorating gel, colored icing, pretzel sticks, or fondant to create eyes, buttons, noses, and scarves.
- → What is the storage recommendation for these treats?
Store them in an airtight container in the refrigerator for up to 5 days to maintain freshness and texture.
- → Are there any common allergens in this dessert?
Yes, it contains wheat, milk, soy, and gluten. Check labels carefully for any additional allergens.