 Pin It
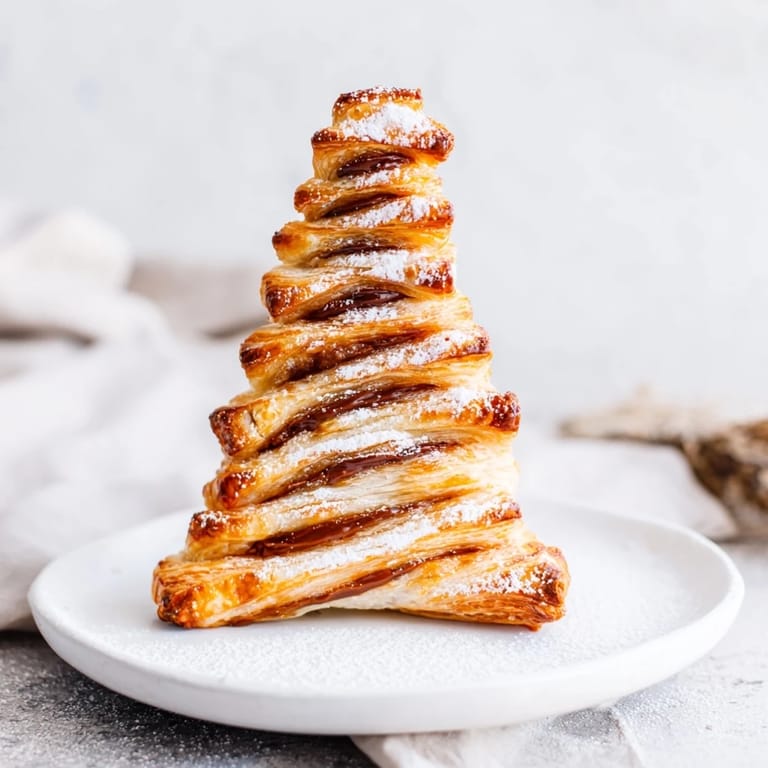
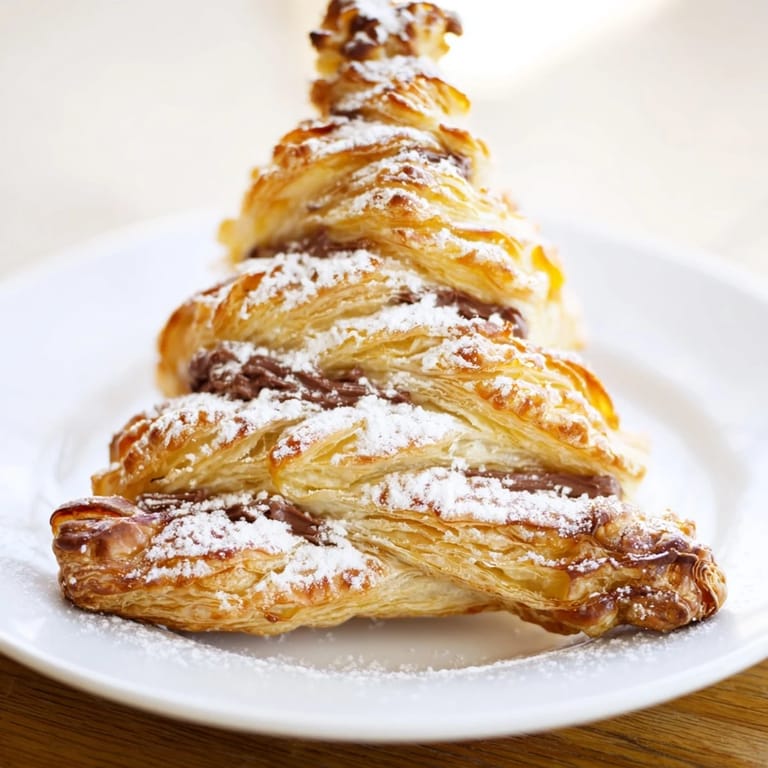
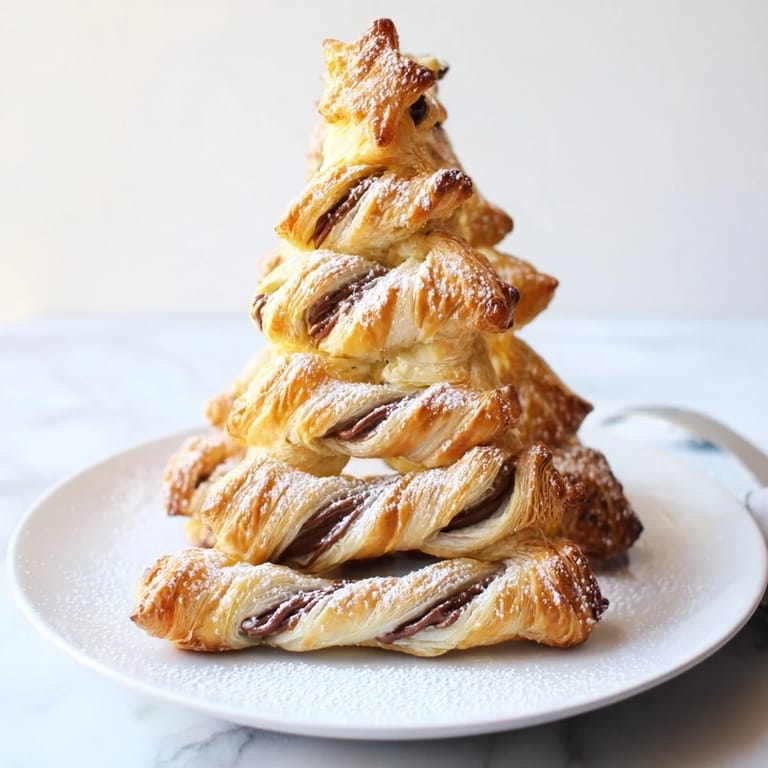
 I discovered these trees quite by accident one December afternoon while scrolling through the kitchen window at a bakery in Lyon, watching a pastry chef layer chocolate and puff pastry with such ease that I convinced myself I could replicate it at home. That first attempt was messier than I'd hoped—my branches looked more like a shaggy dog than a Christmas tree—but when they came out of the oven all golden and puffed, my daughter ran into the kitchen at the smell alone. We dusted them with powdered sugar right there, still warm, and somehow the imperfect shape made them taste better, like they were made with our hands instead of precision.
Last year I made these for a neighbor's potluck who always brought store-bought cookies, and when she bit into one still warm from my oven, she got this look on her face like something had shifted. She asked for the recipe right there, frosting on her lip, and I realized these pastries had become my thing—the one contribution that made people linger at the dessert table.
Ingredients
- Puff pastry (two 250g sheets): This is your foundation, and quality matters more than you'd think—look for all-butter versions that shatter instead of bend, which means they'll puff properly and taste less like cardboard.
- Nutella (120g): Spread it evenly but not thick, or your trees will be too heavy to puff up; I learned this by making dense, sad trees my first time.
- Egg wash (one beaten egg): This is what turns them golden and glossy, so don't skip it even though it seems optional.
- Powdered sugar (1 tbsp, optional): The final dusting that makes them look like they've been kissed by fresh snow—worth the extra minute.
Tired of Takeout? 🥡
Get 10 meals you can make faster than delivery arrives. Seriously.
One email. No spam. Unsubscribe anytime.
Instructions
- Heat your oven and prepare:
- Set the oven to 200°C and line your tray with parchment paper—this prevents sticking and lets the bottoms brown evenly without burning.
- Layer the pastry and Nutella:
- Unroll one sheet, spread Nutella evenly across it leaving a 1-cm border (this keeps the edges free to puff), then top with the second sheet like you're closing a chocolate sandwich.
- Cut your tree shapes:
- Use a sharp knife or tree cutter to cut shapes about 12-15 cm tall, and save your scraps—re-rolled pastry still works beautifully, so there's no waste.
- Add the branches:
- This is where they become trees: make shallow horizontal cuts on both sides of the trunk, then gently twist each branch forward so they fan out slightly and catch the heat in the oven.
- Brush and bake:
- Paint each tree with beaten egg so they'll turn that restaurant-quality golden brown, then bake for 16-18 minutes until they're puffed and the edges are deep golden.
- Cool and finish:
- Let them rest for a few minutes so the insides set slightly, then dust with powdered sugar while they're still warm enough for it to cling.
 Pin It
 There's a moment when you twist those branches that you realize baking is partly theater—suddenly your flat pastry cutout becomes a real tree, and it feels like magic. My son called them "chocolate branch trees" the first time, which is exactly what they are, and I've never corrected him.
The Nutella Factor
I've tried other chocolate spreads and they work, but Nutella has this particular texture that spreads like a dream and doesn't separate from the pastry when it bakes. The hazelnut notes also feel seasonal somehow, even though I make these all year—there's something about hazelnuts and chocolate that whispers December no matter what the calendar says. If you want to add crunch, a small handful of chopped hazelnuts sprinkled before you top with the second sheet makes them feel even more intentional.
Timing and Temperature
The difference between perfect and overdone is about two minutes, so watch them during those final stages—they should be puffed and deeply golden, not dark brown or they'll taste burnt. I learned this the hard way when I got distracted with laundry and came back to trees that looked more like charcoal. The good news is that even slightly overbaked, they're still edible and still delicious, just crispier.
Serving and Storage
These are absolutely best fresh from the oven when they still have that crispy exterior and the Nutella is just barely set, but life gets busy. If you make them ahead, store them in an airtight container and reheat in a 160°C oven for about 5 minutes to restore some of that crispness. They pair beautifully with hot chocolate, mulled wine, or even a strong espresso—something warm that complements the richness without fighting it.
- Fresh is always better, but room-temperature trees are still spectacular with morning coffee.
- Freeze unbaked trees on a tray first, then store in bags for up to a month—bake straight from frozen, just add 2-3 minutes to the time.
- If someone asks for the recipe, you can confidently tell them it only takes 20 minutes of actual work, which feels like a gift.
 Pin It
 These pastries have a way of becoming traditions before you realize it, of showing up on your table year after year because people ask for them and because they're simple enough to make on a busy day. There's something quietly beautiful about that.
Recipe FAQs
- → What type of pastry is best for these treats?
Flaky puff pastry is recommended for its light, buttery layers that crisp up nicely when baked.
- → Can I substitute Nutella with another spread?
Yes, any chocolate-hazelnut spread or similar creamy filling works well to maintain the flavor profile.
- → How do I shape the Christmas trees evenly?
Using a tree-shaped cookie cutter ensures uniform shapes and easier cutting of branches.
- → Is it necessary to brush the pastries with egg wash?
Brushing with beaten egg gives the pastries a shiny, golden finish and enhances browning during baking.
- → Can these pastries be prepared in advance?
They are best enjoyed fresh but can be reheated briefly in the oven to restore crispness.
- → What serving suggestions complement these pastries?
Pairing with warm drinks like hot chocolate or mulled wine enhances the festive experience.